
OKX Guides
How to Withdraw USDT from OKX to a Personal Wallet Without Losing It
A step-by-step check before moving USDT off an exchange: choosing the chain the receiving wallet actually supports, verifying the address and Memo, running a test transfer, and knowing what cannot be undone.
Reviewed 3 September 2026. Supported networks, minimum withdrawal amounts, fees and limits change over time. Read the values shown on your own withdrawal page rather than any figure quoted in an article.
Moving USDT from an exchange to a wallet you control is a single irreversible action built out of four separate decisions. Almost every loss reported by beginners comes from one of them being wrong: the chain, the address, a missing Memo, or skipping a test transfer. None of those failures are recoverable by customer support in the way people expect, so the checking happens before you press confirm.
What actually goes wrong
| Mistake | What happens | Recoverable? |
|---|---|---|
| Chain not supported by the wallet | Funds land on a chain the wallet cannot show | Sometimes, with technical effort |
| Address typo or clipboard swap | Sent to a stranger's address | No |
| Missing required Memo/Tag | Credit cannot be matched to an account | Only via a formal recovery request |
| Sent to a contract address | May be permanently stuck | Usually no |
| Withdrew below the minimum | Transaction rejected or held | Usually reversible on the platform |
Step one: decide the chain from the receiving side
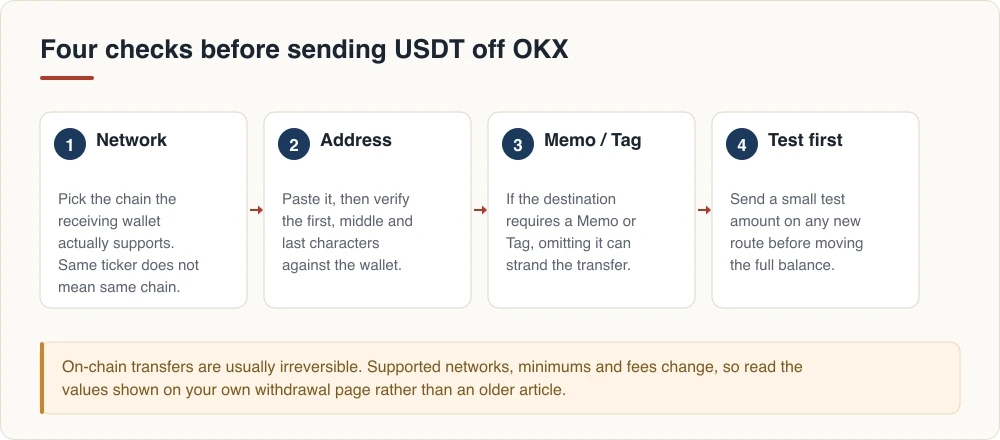
USDT is issued on many blockchains. The token name is identical on all of them, the networks are not interchangeable, and the balance only appears if both ends agree.
Start at the wallet, not at OKX. Open the receiving wallet, select USDT, and look at which networks it offers for deposits. Whatever that list says is your constraint. Then open the OKX withdrawal page and pick the matching network from the options available there.
Do not choose a network purely because the fee is lower. A cheap transfer to a chain your wallet cannot read costs far more than the fee you saved.
Step two: verify the address properly
Copy the address from the receiving wallet and paste it. Never type it by hand, and never retype it from a screenshot.
After pasting, compare the first four characters, a section in the middle, and the last four against the wallet. Clipboard-hijacking malware works by silently swapping a copied address for a similar-looking one, and it usually preserves the opening characters precisely because most people only check those. If the address changes after you paste it, stop and clean the device before doing anything else.
One more check that costs nothing: confirm you are sending to a normal wallet address and not to a token contract address.
Step three: handle the Memo or Tag
Some destinations, particularly accounts on other exchanges, require a Memo, Tag or Comment in addition to the address. On those platforms a single deposit address is shared by many users, and the Memo is the only thing identifying which account should be credited.
If the receiving side shows a Memo field, it is not optional. Sending without it means the transaction confirms on-chain but cannot be attributed, and getting it credited then depends on a manual recovery process that is neither fast nor guaranteed.
If you are withdrawing to your own self-custody wallet, a Memo is usually not required at all. Follow what the receiving side asks for rather than what you remember from a previous transfer.
Step four: send a test transfer
On any new route — new wallet, new chain, new address — send a small amount first and wait for it to arrive and be usable. Only then move the rest.
A test transfer costs one extra network fee. It is the cheapest insurance available against a mistake that has no undo. Skip it only when the route is one you have already used successfully with the exact same address.
While the transfer is pending, do not send a second one because the first feels slow. Both can confirm and you will have sent twice.
After you press confirm
Keep the TxID until the balance appears and is spendable. If the blockchain shows Success but the wallet shows nothing, the usual causes are a chain the wallet does not display by default, a token that needs to be added manually, or the wallet waiting on more confirmations.
If the transaction never appears on-chain at all, the withdrawal may still be under review on the platform side. Withdrawals can be delayed by security holds, a recent password or 2FA change, or limits tied to your verification level. The pending or failed withdrawal checklist covers that path in detail.
For background on which chain to prefer and what the trade-offs are, see the USDT network guide. Setting a withdrawal allowlist in your account security setup also removes a whole class of address mistakes.
Official sources
- OKX: how do I make a withdrawal
- OKX Help Center: deposit and withdrawal FAQ
- OKX: finding a deposit address and Memo/Tag
This article is operational and security guidance, not investment advice. On-chain transfers are generally irreversible and crypto assets carry high risk. Some links on this site may be referral links.